Some time ago I was given some stash items from a friend who was moving away, and in those items there was this sock yarn from
dkKnits called Technicolor Dream Toes, that looks like it's black and gray until you get it into strong light were it turns green. There are also a fair amount of longer coarse hairs in it so it tends to halo a bit.
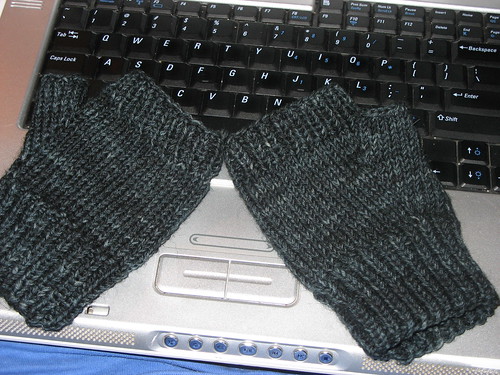
Well I'm not much of a sock knitter but since there was quite a bit of it I thought I could double strand it and make some accessories. Originally I'd intended to make a hat, scarf, & mitten set with it, but after I'd handled it a bit I decided that it was too rough to use for a scarf. I thought though that it would still work for the hat & mittens.
I started with one of my favorite mitten patterns, the Peekaboo from
Pensive Frog and to make it fingerless I used the rib for the finger opening all the way around and then cast it off. I also modified the thumb so it would match by casting off at the knuckle, and I think it worked out pretty well.
For the hat I decided on the Jacques Cousteau hat by
Typy, and I'd gotten pretty far on the hat before it occurred to me to try on the mittens. At first they were just a little scratchy, but I'd expected that, but after they'd been on for a few minutes as I continued to work on the hat, I REALLY started to itch where they were touching me.
Even after I took them off I was itchy for a bit, this hadn't ever happend to me before, not even mohair bothered me like this. A few days later I was talking to a freind who recommended using conditioner to try and soften up the fiber, and I thought it was worth a shot.

So I gathered my supplies, washed them,

and used a VERY healthy dollop to make sure...

they were completely saturated in the goo. I let them sit in the goo for about 20 minutes and rinsed them thoroughly because they REALLY smelled like coconut. After I'd gotten them all cleaned out I laid them flat to dry.
Once they were I tried them on again, and while the fiber was noticeably softer, after a few minutes though I started itching again. I posted my results in a knitting forum to see if anyone else had had the same experience or possibly had other suggestions, and lo and behold I was contacted by the gal who is dkKnits.
She said that because wool is an in demand product, her supplier uses fiber from a variety of breeds. This means that in theory you could purchase the product several times and like the feel of it and not have a reaction to it, and then get a batch that is a different texture and have it be too rough for socks and/or have a reaction to it. She offered to replace it, and suggested that I try her Smoosh line because it's designated as merino.


 Using a small angled blade I inserted it in the side of the eye as close as I could to the white backing as I could get, and slowly slid the blade down the side. I had quite a few mishaps at first with the blade working it's way up the side until I was closer to cutting along the upper edge of the clear plastic. Once I got a little better at it though I was able to get the blade to separate the clear and white plastics giving me a cleaner opening.
 to get the pupil out, I recommend using a pair of tweezers to do so, it allows you to get away with a smaller opening.
 paint worked alright but it took several coats to become opaque. Nail polish though worked really well, you can usually get it cheaper than model paint, and when you're done you can paint your nails to match. I'm thinking of attempting to paint the pupils to look like animal eyes next, but I need to get some good closeups so I can try to make them at least a little bit accurate.
 much lighter than the original pupil so it doesn't move around as much.
 The Eye
 alternate backing and then it would be easier to use the eyes on sewing projects. I'd also like to get some doll making eyelashes and do some more glittered eyelids.


 Posts
Posts


